

Is your car’s AC blowing warm air or smelling musty? That nasty odor and weak cooling likely mean your evaporator coil is clogged with mold, dust, and grime. The good news? You can clean your evaporator coil without removing it — and I’m here to show you exactly how, step-by-step.
As an auto technician with 12 years of experience, I’ve cleaned hundreds of evaporator coils. In this ultimate guide, I’ll share:
- The exact tools and cleaners professionals use
- Car-specific tips for locating your evaporator coil
- Little-known tricks to eliminate odors permanently
- Costly mistakes most DIYers make (and how to avoid them)
Let’s dive in and get your AC blowing ice-cold, fresh air again!
Why Cleaning Your Evaporator Coil is Crucial?
Your evaporator coil is the heart of your car’s AC system. When it gets dirty, you’ll notice:
- Weak cooling performance (takes forever to get cold)
- Musty, moldy smells (especially when first turning on the AC)
- Allergy flare-ups (from bacteria and mold spores)
- Reduced fuel economy (dirty coils make your AC work harder)
Real-world example: Last week, a customer complained their Honda Accord’s AC smelled “like wet socks.” After cleaning the evaporator coil (without removing it), the odor disappeared completely, and the air got 30% colder!
Gathering the Right Supplies (Don’t Skip This!)
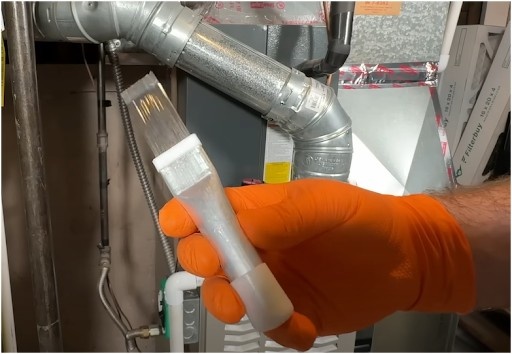 Image Credit- The DIY HVAC Guy
Through years of trial and error, I’ve found these professional-grade products work best:
Essential Tools:
- Evaporator Foam Cleaner (Kool-It is my top pick — expands to reach all crevices)
- Coil Brush (Flexible 12″ brush for tight spaces)
- LED Inspection Mirror (To see hidden areas)
- Microfiber Towels (For wiping away grime)
- Nitrile Gloves & Safety Glasses (Chemicals can irritate)
Bonus Pro Items:
- Endoscope Camera ($25 on Amazon — lets you inspect before/after)
- AC Disinfectant Spray (Kills odor-causing bacteria)
- Compressed Air Canister (For blowing out loose debris)
Pro Tip: Avoid cheap all-purpose cleaners — they can damage aluminum fins! Stick with pH-neutral evaporator-specific cleaners.
How to Clean Evaporator Coil Without Removing It?
Step 1: Locating Your Evaporator Coil (Car-Specific Guide)
This is where most DIYers get stuck. Here’s how to find it in standard vehicles:
- Toyota/Honda:
Remove the glove box (usually 5-7 screws)
Look for a black plastic housing behind it
- Ford/GM Trucks:
Access through the blower motor (under the passenger dash)
- European Cars (BMW, Mercedes):
Often requires removing the center console panels.
Watch out! Some newer cars have the evaporator in ridiculously tight spaces. If you can’t find yours, search “[Your Make/Model] evaporator location” on YouTube.
Step 2: Locating Your Evaporator Coil (AC or Furnace)
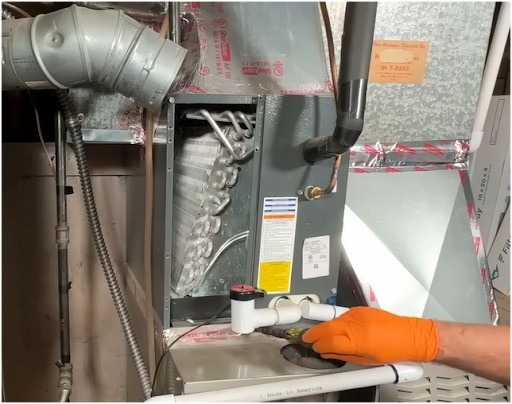 Image Credit- The DIY HVAC Guy
- Before doing any work on your AC, turn off the power to avoid any risk of electric shock.
- Next, locate your evaporator coil. In most systems, it’s found inside the air handler or the indoor unit of your AC system.
- It’s usually behind a panel, so you may need to remove the cover to access it. Don’t worry—it’s not as complicated as it sounds!
Step 3: Pre-Cleaning Prep Work
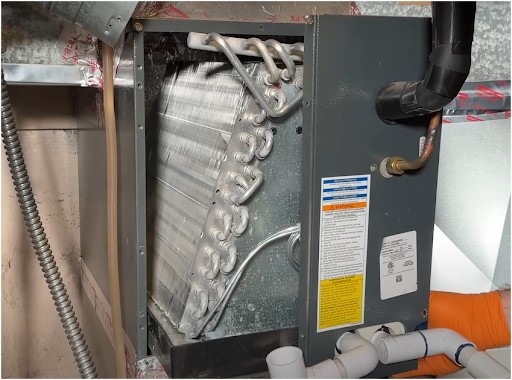 Image Credit- The DIY HVAC Guy
- Disconnect the battery (Negative terminal first) — prevents an electrical shorts
- Remove the cabin air filter (Usually behind the glove box)
- Inspect with a flashlight — look for visible mold or clogs.
Pro Move: Use your phone to take a “before” photo — helps track your progress.
Step 4: The Deep Cleaning Process
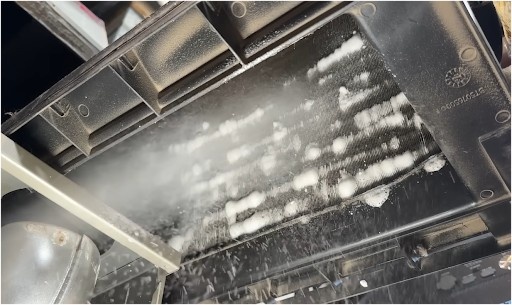 Image Credit- The DIY HVAC Guy
- Apply foam cleaner (Shake can for 30 seconds first)
- Insert the straw nozzle deep into the housing.
- Spray in a sweeping motion to cover the entire coil.
- Let the foam expand and dwell for 15 minutes.
Gentle Agitation:
- Use a coil brush to loosen stubborn debris
- Never use metal brushes — they bend fins!
Rinse & Dry:
- Some cleaners self-rinse as condensate drains
- For heavy buildup, lightly mist with distilled water
- Let air dry completely (minimum 1 hour)
Step 5: Final Touches for Lasting Results
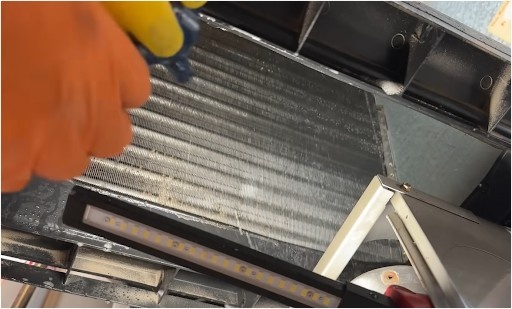 Image Credit- The DIY HVAC Guy
- Replace the cabin air filter (Dirty ones recontaminate coils)
- Run the AC on max for 20 minutes — helps dry completely.
- Apply antibacterial treatment (Prevents mold regrowth)
Advanced Pro Tips & Troubleshooting
Eliminating Stubborn Odors
If smells persist after cleaning:
- Check the drain tube (Clogs cause standing water)
- Use a UV light treatment (Kills deep mold spores)
- Consider an ozone generator (For extreme cases)
When to Call a Professional
Seek help if:
- You see refrigerant oil leaks (indicates bigger issues)
- AC still doesn’t cool properly after cleaning
- Electrical components seem damaged
Maintenance Schedule
To keep your AC fresh:
- Basic cleaning every 12 months
- Deep cleaning every 3 years
- Immediate cleaning if you notice smells
FAQs: Your Top Evaporator Coil Questions Answered
1. What Are the Symptoms of a Dirty Evaporator Coil?
A clogged or moldy evaporator coil can cause several issues, including:
- Musty, mildew-like smells (especially when the AC first turns on)
- Weak airflow (takes longer to cool the cabin)
- Higher humidity inside the car (leading to foggy windows)
- Allergy flare-ups (sneezing, coughing due to mold or bacteria)
- The AC blows warm air intermittently (due to restricted airflow)
Pro Tip: The evaporator coil is almost always the culprit if your AC smells like wet socks or gym clothes!
2. What Cleaner is Best for Evaporator Coils?
The safest and most effective cleaners for evaporator coils are:
- Foam Cleaners (Best for deep cleaning):
- Kool-It Evaporator Cleaner (Expands into hard-to-reach areas)
- Lubegard 96030 (Kills bacteria & eliminates odors)
- Kool-It Evaporator Cleaner (Expands into hard-to-reach areas)
- Spray Cleaners (Good for light cleaning):
- BG Frigi-Fresh (Professional-grade disinfectant)
- Simple Green All-Purpose Cleaner (Eco-friendly option)
- BG Frigi-Fresh (Professional-grade disinfectant)
Avoid: Bleach, vinegar (too acidic), or household degreasers (can damage aluminum fins).
3. What is the Life of an Evaporator Coil?
With proper maintenance, an evaporator coil can last:
- 10-15 years in most vehicles
- Longer (15-20 years) if cleaned regularly
- Shorter (5-8 years) if neglected or exposed to extreme conditions
Signs your evaporator coil may need replacement:
- Refrigerant leaks (oily residue near the coil)
- Corrosion/holes in the fins (visible damage)
- AC never gets cold (even after cleaning & recharging)
Pro Tip: Cleaning your coil every 1-2 years can double its lifespan!
Bonus FAQ: Can I Use Compressed Air to Clean the Coil?
- Yes, but carefully!
- Use low PSI (under 30) to avoid bending fins
- Blow from the inside out (reverse of airflow)
- Use low PSI (under 30) to avoid bending fins
Best for dust removal, but not effective for deep mold or grime cleaning.
Final Thoughts
Now you know exactly how to clean evaporator coil without removing it like a professional. This method has saved my customers hundreds in repair bills, and it can work for you too! Remember: A clean evaporator means colder AC, better air quality, and a more comfortable ride. Happy cleaning!